GO CREATE!
Tuesday, July 31, 2012
The pen pal club
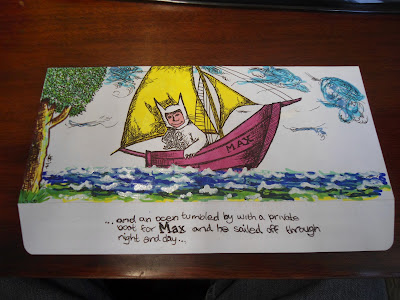
So an old artist friend of mine started an art pen pal club on FB. We have been exchanging one of kind envelopes that each artist creates of his/her own kind. It's kool you know it is! I just got one from an artist in Tenn of one of my fav musicians Miles Davis. This is the envelope I am sending him. Of course of one of my all time children favs Wild Things! Love Maurice Sendak(RIP)...
Friday, July 27, 2012
More fun w/magnets
Here's another magnet I painted yesterday for my sister. Her birthday is tomorrow! She should get it in about 2-3days. Can you guess who this musician/actor is? Its from one of her childhood favorite movies. Highlight the text below the second pic to see the answer. I painted it by cutting out a stencil, then hand painted in some smaller details.
GO CREATE!
Answer: David Bowie as Jereth the goblin king
from the movie Labyrinth
Tuesday, July 24, 2012
Fridge magnet art
So today I did a lil fridge magnet art. Fridge magnet art you say? Yeah, you know those annoying magnets that are like EVERYWHERE? People advertise on them so you remember who they are. I took some that we gathered, well actually only one so far, painted it and did an old school letting sign w/ a coworkers last name on it for her fridge. I think I might be onto something here! The idea actually came from some where else but we won't get into that right now....so here's the before and after of what I did. And it really didn't take that long either. I used a sharpie BTW.
Monday, July 23, 2012
DIY Countertops
These are some progress pics of the DIY oak veneer doors that I am re purposing for our kitchen counter tops. I saw them in an original blog post here $100 wood counter top tutorial . I will con't to post as I finish the kitchen as well which we have been working on for some time. I am trying to do most of the work myself, including a cool hide away pull out trash can that used to be a set of drawers.
What I did with these doors was make sure that there was the same surface area(or close too) as the counters that are already installed in the kitchen. Then I measured out the counter top that contains the sink from the wall to the outside edge. after getting the measurement I started by pulling all of the molding that was nailed to the outside of the door. Then I ripped that piece to size. The other door I will most likely use practically whole as I want an over lapping counter space for a sitting area with stools for the kids or what have you to eat from. Next I sanded down the surfaces to remove the poly or stain from the doors and to remove some of the imperfections as well. I will fill some of the cracks and imperfections with wood filler then re sand to smooth out the surface later. You can see the difference in the pics below from original, to the sanded finish.
GO CREATE!
Wednesday, July 18, 2012
Sea Turtles
Quick 2 min sea turtle sketches w/ball point pen. I am planning on doing these on art paper in ink and framing them for the main bathroom in my house.
GO CREATE!
Tuesday, July 10, 2012
New Works
So I had a very successful afternoon on Saturday this past weekend. I worked on 2 new pieces and prepped several other projects to start as well. Here are a few pics of one of them, an abstract which I am considering adding some graphic to but am not sure. It has plaster texture added to it as well, and I will be clear coating it. It will eventually reside in my home, unless however someone is interested in purchasing it ;).
GO CREATE!
title: "falling skies"
Monday, July 2, 2012
Handmade Envelopes
So if your like most people you probably have or have had in the past a subscription to some magazine. Many of you might even have one for work related reasons. As you know these magazines tend to stack up, and your left with either recycling them or shelving them or you can do like I did a while back and re purpose them. Here are just a few of the custom handmade envelopes I have that I think I will start selling on ETSY!... The great thing is that there is an enormous amount of magazines to choose from. Let me tell you about how these came to be.
-So what I did first was actually deconstruct an envelope I already had to get an idea of how one was put together.
-Next I decided on what i thought might be a good size for my envelope to be. Given that I only had so much to work with in the dimensions of a magazine cover the width could be no greater then what I had to work with.
-After copying the template onto the cover I then cut them out with a small paper cutter I got from Wallyworld.
-I bought glue and labels to finish them off, along with double sided adhesive strips so you can close them when ready to mail.
Subscribe to:
Posts (Atom)


.JPG)


